

Starfleet Universe
Current
News
Old
News
Interviews
Articles
Downloads
Tutorials
Staff
SFC Community
SFU
Forums
Links
Modder
Policies
Nightsoft
STGU
SFC Volume III
Press
Coverage
Ship Profiles
Screenshots
Model Installation
SFC Orion Pirates
(SFC2:OP)
Picture
Gallery
Mods
Installation
SFC Volume II
(SFC2:EAW)
SFC2
Dev. Diary
Picture
Gallery
Online
Gaming FAQ
Interface
SFC Volume I
YnrohKeeg's
Tactics
Mission
Reviews
Game Information
Music
Gallery
Picture
Gallery
Hosted Sites
Newships Project
Omega Sector
Fleet Dock 13
SFC Briefing
Vulcan Yards
Get Hosted!


Link Back to Us!
|
|
Starfleet Command III: Ship Model Guide |
In additions to the
Step-by-step guide (this page), Starfleet Universe is also proud to
host two other manuals that explain the intrigues of SFC3 modelling
and modding in better detail.
By Chris
Jones and expanded by 3dot14
This Guide offers a step by
step instruction as to how to import an SFC1/2 model (or an SFC3 model
not previously prepared) into SFC3.
- Determine, of course,
which model you want to add. For this guide, Maggot's Dominion
Battleship is used. Copy (or extract from zip/rar file) the
model to the assets\models\ folder of SFC3.
To keep things simple, rename the folder to something easy. In this
case I'll use DomBB.
This model must have a break model. (_brk.mod) If it does not, refer
to the Modelling Manual above for the methods of creating one.
- Using Notepad or Textpad
create a DomBB.gf (or yourmodelsname.gf) file in the
directory. It does not have to have any text in it, for now. (This
file will later be used by the modding tools to place glow effects
(step 6) as well as weapon hardpoints (step 12).)
 |
| Figure 1. Adding
glow regions to the model |
- Open up the folder for
the new model (located at assets\models\DomBB\), rename
the mod and the break mod to the same name as the folder, in this
case: DomBB.mod and DomBB_brk.mod
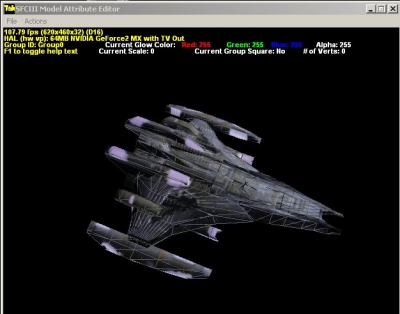
- Open up the ModelAttributeEditor
(part of SFC3 Modding Tools) and load the mesh DomBB.mod.
Follow the procedure in the utility (use F1 to toggle) to add glows
to the model. Save changes.
- Open up the DomBB_brk.mod
and do the same thing.
(Figure 1.)
- After the glows are
done you'll notice two new files in your directory, DomBB.X
and DomBB_brk.X. They are supposed to be there.
At this point, run the "RECACHER" utility
in the SFC3 Modding Tools on the model.
 |
| Figure 2. Ship
Description. |
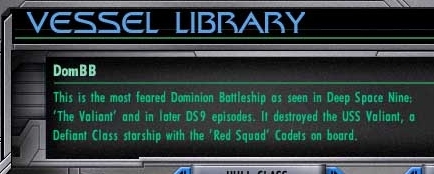
- Create a DomBB.txt
file in the folder as well. Put a description of your ship in there.
Be creative as this is what is seen while selecting your ship to
play. You can change the name of the text file, which will change
the class Designation of the ship (see figure 2.)
- Make backups of your
DefaultCore.txt and Defaultloadout.txt
files in assets\specs (always BACKUP!)
- Use Microsoft Excel
and Open DefaultCore.txt
- Insert a new line
into the file right below the ship you wish to copy from.
- Copy the line above
where you inserted the new line (in this case the Borg Cube)
and paste it into the new blank line.
- In Excel - locate
these two headings: Classname,
and AlternateUIName, and scroll
down to your new entry.
- In the Classname
put the name anything you like for example: Borg-Battleship2
(use an existing name would create a new "variant"
of the existing ship. Use a new unique name would create a new
"hull class" in the game.) And for the AlternateUIName
put DomBB. This is the folder name created in
Step 2.
- Save and close
the DefaultCore.txt
- Use Microsoft Excel
and open up DefaultLoadout.txt. (See figure 3.)
- Scroll down to Borg-Battleship
(the same name you copied in the DefaultCore file in Step 9b.).
- Copy that row, and
paste as a new row below Borg-Battleship.
- Under ClassName,
put the classname created in step 9d. In this case: Borg-Battleship2.
- Under SubName put
DomBB. This entry must match the name
of the text file created in Step 7. In this case, since the
text file is DomBB.txt, enter DomBB.
Had the name been "Dominion Battleship.txt", enter
"Dominion Battleship".
- Under UIName put
DomBB. This entry must match the name of the folder
created in Step 2.
 |
| Figure 3.
DefaultLoadout.txt |
- The UI of the new model
consists of 3 files. There dimensions are fixed. (Figure 4) they
must have names that have the same beginning
as the .mod files. In this case, all are named DomBB--.BMP.
Look at the templates in \assets\models\modinfo for
more information. And use existing pictures as further guides.
There are several ways to obtain these pictures.
- The easiest (and
most expensive) way is to use Discreet's 3DStudioMax
or Milkshape3d
by chUmbaLum sOft
to import the model file then produce the renderings and save
them as bmps.
- Or, the cheaper
way: use the Taldren
Model Viewer to open the model, and use "PrtScn"
key to produce a screencapture, and paste into a Graphics Program.
- Or, even the screenshots
in game. (In SFC3, press F9, F2, and F5. Then use Home/End/PgUp/PgDn
to rotate camera until the angle is right, Press F12.) This
will produce a bmp file in \screenshots in the
SFC3 folder.
- Once you have the
bmp files in a graphics program such as Paintshop Pro, Photoshop,
Photopaint, or MS Paint, you can Crop and Resize the pictures
in accordance with the templates provided in in \modinfo.
It is recommended that the ships are "keyed"(carved
out as a separate layer away from the background) out and placed
on the clean-black background or the guide-grid as shown in \modinfo.
 |
| Figure 4. UI graphic's
sizes in pixels. |
- ---BS.bmp
is the Beauty Shot of the ship in perspective view. It is used
at Refit and Vessel Library's upper right hand corner
- ---TI.bmp
is the Tactical Interface view. It's the picture where the ship
schematics is displayed in
battle.
- ---VL.bmp
is the Vessel Library view.
- One last step is the
hardpoint configuration and ship specifications. If the model has
preexisting hardpoint arrangements, it is recommended you DO NOT
ADD new ones (you can remove or change them.) Since the hardpoints
are related to the 3D model file.
- OPTIONAL: Use SFC2ED
or 3DStudioMax or Milkshape3d
to import the model and determine where the hardpoints are,
and how many are there. This way the hardpoints can be better
positioned to correspond to the icons in the Tactical Interface.
This is not required, and can be done by trail and error. For
more information, consult the Modelling Manual by Taldren.
- Use the SFC3
HardpointPlacement Utility to open DomBB.gf
and place the hardpoints. The big icons are used for Vessel
Library, and the smaller ones for Tactical Interface. It is
highly recommenced you note the order and positions of each
hardpoints as you go. It will make life easier in the Excel
step.
- Open DefaultCore.txt
with MS Excel and scroll to columns labeled Cargospace,
Hullspace, PowerPlant, Weaponspace, and
Shieldspace. There are the mass setting restricting a
ship's load out.
- Find the Marine,
Mines, and Shuttles columns. They are straight
forward enough. The format is "default:maximum:default".
For example if the ship is to have default 3 mines and maximum
8 mines, the entry in Mines field is "Mines:3:8:3"
- Now, we need to
enumerate the hardpoints placed in 12a. and assign the weapon
hard points their respective arcs. Find the columns labeled:
Primary, Heavy, Hull, Bridge.
- Start with the
easier ones. For Hull, enter: HullHP:1:2:3.
- For Bridge,
recall how many bridge hardpoints were placed. Then put
down the numbers. For 1 bridge HP, put "BridgeHP:1",
2 HP's "BridgeHP:1:2" (most common), 3
Hp's"BridgeHP:1:2:3".
- Primary,
Heavy work similarly. First in the column put "PrimaryHP:"
or "HeavyHP:" to distinguish the type
of weapons. Then follow it by a series of numbers. For example:
PrimaryHP:1:300_360:2:0_60:3:240_300:4:60_120:5:210_270:6:90_150:7:0_360
The black characters
are the header and the delimiters (semicolon). The red characters
are the hardpoint numbers. (Refer back to the HPPlacement
Utility if necessary.) And the Blue characters are the weapon
arc itself.
- More on the
arcs: The weapon is the the angles which the weapon is capable
to firing. The game use two numbers connected with an underscore
to define the arc. The numbers always go clockwise. Think
of it as a navigation compass. Zero (0) is due north, (direct
ahead or bow), 90 is due east (right hand side, or starboard
side), 270 is due west (left, port), 180 is due south (back,
astern.) Although the arcs can be entered with impunity,
not every definition will be legal in the game. (i.e. game
may not have the graphics for it.) Only the following arcs
are tested in game: (you can download Lord
Vaders Firing Arc Guide to visualize these arcs)
|
0_60
|
60_120
|
120_180
|
|
180_240
|
240_300
|
300_360
|
|
330_30
|
150_210
|
165_195
|
Try to match the
arcs with its position on the model (step 12a.).
- If the ship
doesn't work, look for an invalidship.txt
in the SFC3 folder, and see if your ship passes the muster
of the game. If not, fix (increase or decrease slightly)
the offending entries.
- If you wish to change
the default configuration of the ship. Open Defaultlodout.txt
and enter one item per column. The format is "system:hp#".
The hardpoint number can be seen the in HPPlacement Utility (step
12b)
- Note: a customized
officer is considered one item. Consult the default entries in
the file for further information.
- Note: the Special
column is used to limit ship involvement. AI means
the ship is for computer players (Artificial Intelligence) in
campaign (singleplayer and dynaverse 3) modes. NS
means "not selectable". This is used on Legendary or
Mission-specific ships.
- Test your new creation!
(figure 5 and 6.)
 |
| Figure 5. Skirmish
settings |
 |
| Figure 6. Dominion
Battleship |
- If the Model comes with preexisting installers. Use the installation
methods provided before attempting this.
- The new engine uses Dynamic levels of detail, so there’s just
one model (not three) Due to this, the new engine is more sensitive
to modeling techniques and errors. It may crash with some models that
SFC2 accepts.
|
