
The Guts - Page 1
The Process:
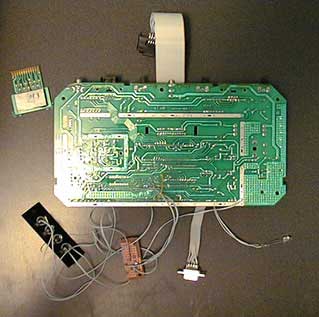
As I stated before, I'm starting with a 2600 Junior system. After opening the beast up and removing the board, the experimenting can begin.
First, I needed to get comfortable soldering and removing components from the Atari while keeping it operational. I started with the obvious, the 2600 video/ audio out modification.
With that complete and working very nicely, I removed the cartridge connector from the board and re-connected it via a ribbon cable.
The player 1 joystick port was next, followed by the power supply. Now I was comfortable playing with the board and maintaining operation.
After obtaining the schematics of the 6 / 4 switch Atari units, I need to design a new PCB that will be very small and lose any extra components.
After the PCB is designed, I need to etch it and populate it with new components. This will validate that my design works, and that the component values that I've been working with are accurate.
Once I have a working PCB prototype, I can make many boards simoultaneously, and at a pretty low cost (assuming 25 or more units at a time - I'll be able to save a lot of money in bulk).
I'll be using new components wherever I can, to extend the stability and life of the CE.
The plan has evolved, because I intend to make the most stable and professional unit that I can.
Comments? Questions? Answers? Email me!