| Movelist |
| X |
NAME |
MOVE |
DAMAGE |
DESCRIPTION |
RATING |
B
A
S
I
CM
O
V
E
S |
Downward Heel Kick |
  |
10-13 |
a 180 degree vertical kick |
3 |
| Middle Kick |
 |
8-10 |
a straight, middle kick |
3 |
| Light Middle Punch |
|
3 |
a weak punch |
2 |
| Low Sweep |
 |
6-8 |
a low kick |
10-13 |
| Punch Chop Combo |
|
3,3 |
two middle punches |
3 |
S
M
A
S
HA
T
T
A
C
K
S |
Air Flame |
+ |
16-30 |
an anit-air flame attack |
4 |
| Super Punch |
+ |
14-18 |
Samus punches with her cannon |
4 |
| Super Low Sweep |
+ |
11-16 |
a full low sweep |
4 |
S
P
E
C
I
A
LA
T
T
A
C
K
S |
Screw Attack |
 |
up to 14 |
Samus's third jump; her suit turns into a weapon and executes a spinning hit combo; useful to finish a combo |
5 |
| Charge Shot |
|
none |
charges up for the projectile Fire Shot; if you need more time to charge, do a block at any time during this move to you can charge the remaining charge later (yes, you can save what you charged) |
3 |
| Fire Shot |
After Charge Shot
|
20-26 |
a very powerful projectile blast; you can, however, press at any time during the Charge Shot to release the blast |
4 |
| Ball Bomb |
|
7-9 |
Samus rolls into her a Morphing Ball and drops these bombs; this attack can help you float through the air if you need to get back on the platform again |
4 |
T
H
R
O
W
S |
Forward Throw |
Grab, then (or ) |
12-16 |
Samus grabs her opponents with her grappling beam and then throws them forwards |
3 |
| Back Throw |
Grab, then |
14-18 |
Samus grabs her opponents with her grappling beam and then throws them backwards |
3 |
I
NA
I
R |
Upward Drill Kick |
|
10 |
an upward drill kick; for a combo, follow it with the Screw Attack |
4 |
| Flame Thrower |
|
16-20 |
a forward flame attack |
5 |
| Reverse Roundhouse Kick |
 |
11-14 |
a powerful backwards kick (very strong) |
5 |
| Kick |
|
12-16 |
a straight kick |
4 |
| Low Shove |
|
11-16 |
a Meteor Smash; Samus smashes her opponent with her gun |
4 |
D
A
S
H |
Shoulder Charge |
While running, |
9-12 |
Samus shoulder slams to her opponents |
4 |
T
A
U
N
T |
Taunt |
 |
none |
Samus salutes with her gun as a sign of victory |
- |
|
| Pros & Cons |
» Pros
· high endurance
· multiple combos
· powerful projectiles
» Cons
· slightly slow
· rolling dodge is slow
· not recommended for beginners
|
| Strategies |
Samus is equipped for both long-ranged and short-ranged combat.
With her handy arm cannon, Samus can blast away foes that do not like to play up close.
To use her gun, first charge it by pressing and wait until it charges (if you want to stop it during the middle of its charge, press again and it will save what you have).
Once you have it charged, press again to fire it.
While the blast is very strong, it is relatively slow moving down the stage.
During hand-to-hand combats, Samus's Super Punch effectively deals lethal blows.
If your opponent is dodging too much for you, use Samus�s Super Low Sweep.
Samus has the advantage of being able to perform combos.
After knocking your opponent off their feet, try using her Screw Attack.
It deals appropriate damage and save you during tight situations.
|
| VS Samus Aran |
|
There are two things you should watch for when playing against Samus.
First, she has a tendency to grab you with her grappling beam.
When she does, you will more than likely avoid it and will have the opportunity to attack while she's open.
Next, when you begin a hand-to-hand combat with her and get to close, she'll use her Screw Attack to get herself out of danger.
Make sure that you block the attack.
|
| Bonus Stage 1 |
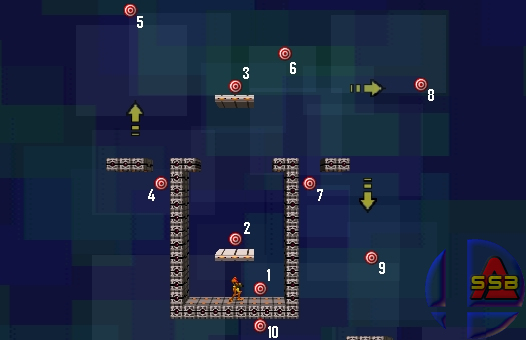
Click on the picture to enlarge.
- Hit the target.
- Jump on the platform above you and hit the next target.
- Double jump up to the moving platform and hit that target.
- Move down to the left most platform. Jump over the openning (leading down to the target) and drop a Bomb (). The Bomb should hit the target.
- Jump back on to the floating platform. Looking to the left, double jump up, and with proper timing, shoot with your Charged Shot (just press once) to hit the target.
- Get back on to the floating platform (for the last time), jump once and hit the target to the right (marked number six on the image above).
- Proceed to land on the small platform (the two-blocked one on the right of the moving platform and in the middle of the screen vertically). Jump over the openning (leading down to the target) and drop a Bomb (). The Bomb should hit the target.
- Get back on the two-blocked platform. From there, double jump and shoot the target with your Charged Shot.
- Once you hit target #8, let yourself fall down to the lowest platform. On your way down, hit the platform with a Kick.
- When you land on the platform, face left and shoot the final target.
|
| Bonus Stage 2 |
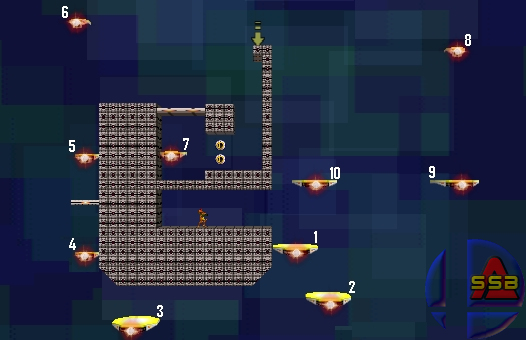
Click on the picture to enlarge.
- Run to the right and step on the platform.
- When the platform gets below you, land on it.
- Let the platform #2 get as far left as it can, then fall off. With proper timing, jump once, drop a Bomb (but hold your joystick in an angle pointing toward the direction you are going: Down Right), and finally perform her Screw Attack ().
- Timing here important. First, jump once to the left, jump up towards the moving platforms above, and preform your Screw Attack. Try to land on any platform (if you get on one of the main platforms, then better). What you do is keep on double jumping and landing on platforms (the non point ones) until the real on appears. (Press to land on a platform faster.)
- Use step from platform #4.
- Once you get those two platforms, jump on the stable ledge to your right. From there, triple jump up to the next platform.
- Fall back down on the stable ledge, and proceed by running to the right. Fall down the little hole and pass through the bumpers by Roll Dodging through them (activate your shield, then press ). Jump on the platform.
- From there, jump up through the thin wall above you. Again, run to the right until you reach the hole (where you fell to get platform #7). At the edge, jump up twice to stand on the little platform (the top-most platform). BE CAREFUL NOT TO FALL OFF! If you do, you'll have to start from step one to get back. From the top ledge, jump to the right twice, then start drop two bombs to get you closer to the platform. Finally, perform your screw attack to land on the platform.
- Jump straight down and land on the platform.
- Jump to the left and land on the final platform.
|


