| Main | The Car | The Computer | The Concept | The Construction | |||
 | This is the space available to fit this baby into. A bit smaller than originally thought, but nothing too tight |
| This is the display I used, It's sold under three names that I know of: RCA Panisonic and Optimus. I got a deal on the Optimus during the short time I worked at radioshack (learned my lesson too) and it seems to be an allright unit. Note: this TV does not have a 1 to 1 pixel ratio, there is some compression, leaving potential for some games to be difficult to read/play. The display is not active matrix like the VCSp, so playing kaboom can be a real challenge, especially when it's cold. Other than it's cost cutting downfalls I think the display works out pretty good, plus I got a good deal. |  |
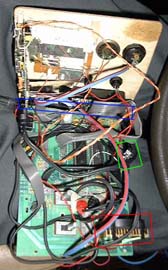 | Here is the overall construct, you'll notice with closer inspection the Atari board has been slightly modified. The blue square brings to attention the part of the board that is missing. This included the Select and Reset switches, a controller plug and some RF components (including the silver box) by the way this atari board is a second generation and was in one of the fancy Sears cases. Now the green square puts focus on the composit output modification, which alowed me to cut off the extra RF junk so it would fit in the car. I'll try and put a link to the VCSp site that has a good explination on how to accomplish this. Onward to the red box you'll see a gold heat sink with a small fan attached, this is because I am using the 5v regulator on the atari to power the TV as well as the Atari, things seem to really heat up otherwise. |
| Allright, this is the back of the faceplate. it's a bit hard to make things out with this picture (sorry for the low quality of these I'll try to get some more taken in the daytime) basically what we have here is a Cartridge plug on the lower right two controller plugs in the lower left, the TV cracked open and stuck to the back, a speaker and a power switch. The blue box is over the power switch and to the left of that is the speaker. The red box is where the TV is mounted. If you look closely you'll notice the half of it on the left is perpendicular to the faceplate; this is so I didnt have to take off the volume and contrast controls mounted on the side of the board. Mounting the board like this seemed the easiest route for getting the volume and contrast controls of the TV helf securely onto the faceplate. The green box is showing the wires (a bit hard to see) I ran that power the backlighting and the LCD. On the other side there is a thin plastic ribbon cable which controls the actual display. Finally the yellow box shows where the AV plugs in, I didnt want to mess around getting wires soldered to the TV board (I was close to finishing the electronics part) so I just left this plugged in like so, with the other end tied to the composit and audio output. | 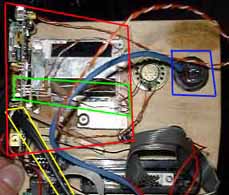 |
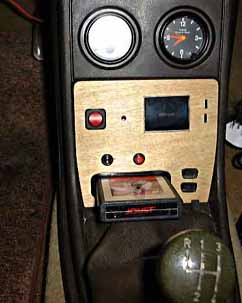 | And we come to the front of the project... Not quite finished, but clean enough to leave for now, untill I get some stain to darken it. Hopefully I can match the other wood trim in the car. I also have some extras I'd like to put on and maybe eventually expand the usage of the unit to include the TV functions of the display. |
© 2001 Troy Kellogg. All Rights Reserved. AtariMobile; features, product descriptions and screen shots. | ||||