This is a simple tutorial to show you how to make a car in the zmodeler program. It will tell you how you should align the vertices, making for the easiest and fastest way to make a car.
STEP 1
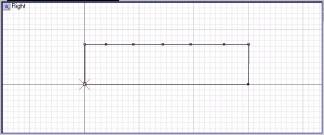
Click on “create\spline\linestrip”. Then go to the view “right” (one of the side views). Click in the view to activate the box. Then click on the little “x” in the center of the view and move up. Now u have to create a line of multiple points. (I recommend not using more than 15 points on the top line, it will help cut down on the amount of polies). Then go down and put another point level with your 1st point, and connect those 2 points. For an example I have a picture showing u how it should look.
Step 2
Click on “Create\surfaces\Revolution”. Then click on the side view again and click
on the spline, and then go to the front view and click in the box. Also click
on the spline in that box. If u have done this correctly a box should appear.
Where the box says horizontal steps take it up to 14 (for the definition of the
bottom of the car [wheel area]) 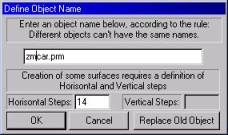 Also
you can rename your car here. Whereas I have called mine zmcar.prm (when
exporting that is the name that will appear for the prm.) When you are done
click “ok”. You should have something that looks like this in the front view:
Also
you can rename your car here. Whereas I have called mine zmcar.prm (when
exporting that is the name that will appear for the prm.) When you are done
click “ok”. You should have something that looks like this in the front view: 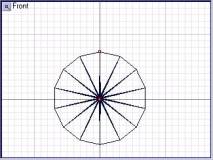 note there are 14 sides to this circle. Now,
wherever your toolbox is, click on the “MUL” button. Then in your main tool
box, click on “modify\move” and switch to vertices level, shown in the picture.
(when I refer to “levels” I refer to the buttons shown in the picture”
note there are 14 sides to this circle. Now,
wherever your toolbox is, click on the “MUL” button. Then in your main tool
box, click on “modify\move” and switch to vertices level, shown in the picture.
(when I refer to “levels” I refer to the buttons shown in the picture” ![]()
Now, zoom in to where the vertices all meat by pressing the + and – keys on the number pad. And move all the points to a central location on top of each other.
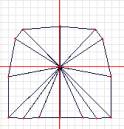
Now, we will move 7 vertices of the object to the bottom, for the bottom of the car, also place the other vertices where needed. As shown on my car:
Now, go to the right view and switch to “modify\delete” and
change to “faces level”. (Sometimes when switching levels, you have to switch
to “object level” and then to the level you want) There will be a thin line
going thru the center of the object, with no vertices on it. Delete those lines
without deleting important polygons. Switch out of “MUL” mode, but once done,
turn it back on. Now, arrange the vertices on the side view so that your car
looks like a car. Don’t forget to switch back to “vertices level” and go back
to “modify\move”. My car is shown: 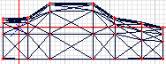
UV MAPPING
Now, for the UV mapping. Which is the hard part. Click on “view\textures management\textures browser…” and load the texture you want to use by hitting “add”. Once you locate the file, hit “ok”.
Now, go to “select\Quadr” and go to “faces level”. Right click and hold, then drag across your object, and hit “Ctrl+A” on your keyboard. Click “misc. values” And check the button that says “no transparency”. This will make your car visible in the game.
Now to make the bmp. Hide all unnecessary faces to your car. Thus I have left only the RIGHT side of the car visible. (It’s easier to map the sides of the cars, then top, front and back and bottom, in that order) To hide the faces go to “display\hide”. Once you have your faces hidden, open up Hypersnap DX. If you do not have it, click this link and download it: http://www.hypersnapdx.com : Take a picture of the side of the car you want to map (preferably at a size that will fit your bitmap [size 256x256]) Then, open the picture you just took into 1 of your paint programs, and cut it out an put it on the 256x256 map, wherever you like.
Now, to load the texture completely into zmodeler. Click the “material editor”, the button looks like a blue ball. Where it says “name” at the top: put in something like “mycar.bmp” then click the “add” or “copy” button. On the scroll down list, find your new name. Now, go down to the bottom and click the box beside “Primary texture” and hit the “Load map…” button, and look for your bitmap. When you have found it and loaded it, hit the “Apply changes” button.
Now, Change the 3d view to the UV mapper. Do this by right clicking on the upper left corner of the 3d view. Change your Right (side) view to the 3d view, by doing the same thing. And change the views on the left hand side of the screen to the same thing (in this case it would be the right view). Zoom 1 of the right views in far enough to see all of your polygons. And zoom the other WAY out. (so much, u can’t see ANY of the polygons)
Now, go to “faces level” Go to “Surface\mapping\assign UV” Now go to the view where you zoomed out (make sure the “MUL” button is still on), and hover your mouse over the centre axis, meanwhile looking at the enlarged view to make sure all polygons are highlighted. When all polygons are highlighted, left click. The polygons should now be on the UV mapper. Get in “objects level” and move (modify\move) the object over the bitmap shown in the UV mapper, and match it up. Once you have that mapped. Click on “display\unhide” (while in faces mode) and click on the object, and repeat the UV mapping part again, until car is fully mapped.
When the car is completely mapped, it’s ready for exporting. Click the button that looks like a page with a red arrow, and scroll down to “ReVolt meshes (*.prm)”. Export your car as “mycar.prm” or whatever. NOTE: YOU MUST TYPE THE EXTENTION OR IT WILL NOT EXPORT! AND DO NOT EXPORT TO THE DESKTOP ELSE THE PRM WILL BE BLANK! (export to folders)
Hope this helps everyone!J
My apologies:
I’m sorry it took so long to push this tutorial out. I know many of you were waiting for it (more people than I knew). I started it, then quit, cause I lost the enthusiasm for it. BUT ITS DONE NOW!!!!! WOOT!!!