The command file can be the most confusing aspect of using glue. In this section I will attempt to explain the command file in a clear and concise manner. I would recommend going to the Easy Glue website if you are still having problems understanding the command file. The URL is http://www.perror.de/rv/easyglue/. However there are some advanced features and precise functions that you will not be able to obtain from Easy Glue as it is set up for the first time user to aid he or she in their track creations.
OK first off what we need to do is write down a basic outline of what you want to achieve with glue. For the first example we will be working with a editor based track and perform the simpler tasks of glue such as adding the instance (.fin) file to the world (.w) file and changing the color of the ugly blue walls. So we have two steps that we need to write a command file for. The first step is gluing the instance (.fin) file to the world (.w) file. To do that you will first need to rename your current world (.w) file to editor.w and change the instance (.fin) file to editor.fin. The reason we do this is because glue will not read a file with the same name as the file it is attempting to create. Editor is just a word I like to use. You can use whatever you want but for the sake of the tutorial and until you get a better understanding lets stick with the word editor. After you change the names of the the files you will then need to open notepad and type out the first section of the command.txt file.
Image 2.1 at the right shows you what that first section should look like.
Each line in that file has a function.
Create (MyTrack) - tells glue what you want the output files to be named.
editor.w - tells glue that you want the current world file included in the gluing process.
editor.fin - tells glue that you want the current instance file included in the gluing process.
Now we will want to include the command for coloring the blue walls. To do that we need to use the legosplit function along with the colorize command. The blue walls are referred to in Glue as pwall so image 2.2 at the right shows what the command file should now look like.
All I did was take the previous file and add the lego split option.
legosplit - tells glue that you want to separate all the pieces of a editor based track and perform functions on them.
pwall - tells glue what section of the editor based track you want to customize, in this case it was the blue walls.
colorize - tells glue that you want to color the blue walls.
RGB Value - this is the color you want to use for your walls. In this case I chose 255 0 0 for my RGB which is bright red. RGB stands for the Red Green Blue value of the color. You can obtain this value by opening MS Paint or any other paint program you have and selecting a color you like. In Ms Paint the RGB is displayed by clicking on the colors drop down then edit colors. Once that window pops up you choose define custom colors and you will see a color selection area and the RGB listed on the lower right. You can also insert a name for your color. Glue supports 477 named colors. These colors are listed in the named colors section of the Glue Documents. Now what you do is save this document as command.txt.
Section 3: The Batch file
Once you have created the command file you can create the batch file required to run the command file. To do this open notepad and type in "rvglue command.txt".
Image 3.1 shows you what this should look like.
What that line does is once the batch file is clicked on it starts glue and tells it that your command file is named command.txt.
Now save this file as rvglue.txt.
Once you save it you will have to change it to a .bat file. This is done simply by locating the rvglue.txt file in you just saved and right clicking on it. Once you do that scroll down the pop up menu till you find rename and click on that. You will see the file name highlighted. Choose only the extension".txt" and change it to ".bat". Windows will ask you if you are sure just tell it yes. You should now see the icon of your rvglue.txt change to a icon with a gear on it.
What is that you say? You don't see any extension to change? Well that is easily fixed. Open a folder and go to the view drop down. Scroll down to folder options and select it. You will see a window pop up that has three tabs at the top. Select the view tab and look down under files and folders. Look for the "Hide file extensions for known file types" selection and remove the check from it. Image 3.2 shows a picture of the interface I mentioned. Once you do that click apply and you are done. You should now see the file extensions for each file in your folder. Then go through the above mentioned steps to create the batch file.
Section 4: Running Glue
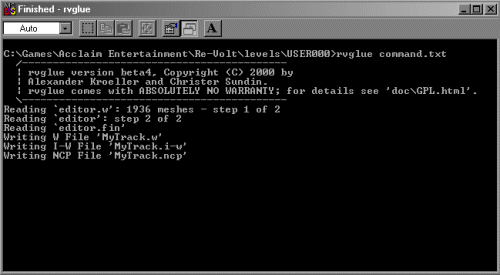
First off we need to make sure that your rvglue.bat file and your command.txt file are within your track folder and that the rvglue.exe file is either in your windows/command folder or within your track folder. Also make sure that the required .dll files are in the Windows/system folder. Once you are sure all of the above steps have been completed then just locate the rvglue.bat file within your track folder and double click on it. You should see a small dos window pop up and confirmation that that glue is performing the required functions. Image 4.1 below shows what that dos window looks like. If you receive an error go through all of the above steps again and make sure all it as it should be. Then try running the rvglue.bat again.

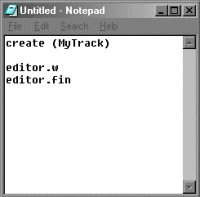
Image 2.1
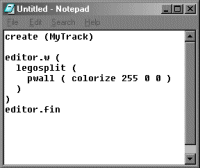
Image 2.2
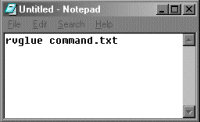
Image 3.1
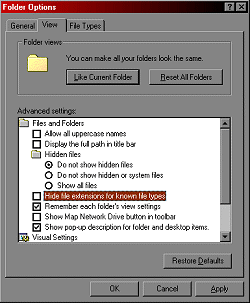
Image 3.2